Fix Lost Administrator rights in Windows 11 and Windows 10
In many cases, the user account in the computer loses administrative rights. This action affects computer usage, like being unable to install a program, make changes that require elevation etc. This article suggests how to fix lost administrator rights in Windows for a user account on the computer. It might be due to Malware or something misconfigured in User groups.

Symptoms
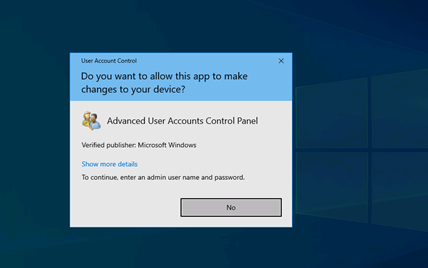
As seen in the screenshot, the user would not be able to press yes as there is no administrator account on the computer, therefore unable to do specific tasks.
Method 1: Enable the Built-in Administrator account.
Every OS installation has a built-in administrator account which is typically hidden and is helpful for issues like these. From the built-in administrator account in Safe mode, you can change the user type to Administrator from standard, effectively resolving the problem.
Initially, See the steps below on how to access Safe mode:
- Perform a hard shutdown two times during the Windows boot screen. On the third time, Windows should boot to the recovery environment. You can also press and hold Shift+click Restart on the lock screen to open Windows Recovery.
- Click Troubleshoot on the screen. Then choose Advanced options>Start-up Settings.
- Select Restart.
- Press 4 to launch the computer in Safe mode.
Afterwards, Windows should log you into your standard account. From there, type netplwiz in the Run dialog box. You should now see a prompt asking for the superuser admin account password. The password is usually blank, and clicking yes without entering anything should do the trick. If that does not help, try entering the password of your user account that has lost administrative rights.
Now, the next step is to regain lost administrator rights. For that, double click the username to open its properties.
Next, click the group membership tab.
From Standard user, change the membership to Administrator and click OK.

The user account would now have administrator rights restored.
Method 2: Use Command Prompt at boot
Compared to Option 1, Option 2 is slightly complicated and is recommended if Option 1 does not work.
Please open the Windows Recovery environment using the steps given in Method 1.
From there, click Advanced options and select Command Prompt.
In the Command Prompt, type regedit.exe and press enter.
Click the HKEY_LOCAL_MACHINE key. Select the Load Hive option from File.
Select the Hive from the root of the existing Windows installation, i.e., C/D:/Windows/System32/config. By default, the SAM file is loaded of the Windows Recovery environment called X drive, so make sure you select the correct SAM from the C drive.

Following, Under config, select the file named SAM and click OPEN. Name it SAM_REG and click OK. Afterwards, it would load in regedit with the same name.

Then, go to REM_SAME>Domains>Account>Users>00001F4. Expand the F(REG_BINARY) on the right and double click the same.

It should show the Binary editor.
In the Edit Binary Value box shown above, place your cursor on line 38, in the right side of 11. Press the backspace key now and then type 10. Click OK. The final value should look like this.

Restart your computer in normal mode.
To conclude, these steps can help you to regain lost administrator rights in Windows.
Also check::
Troubleshoot Windows 11 failure to start – Your Windows Guide
